Eric Monjoin
Staff Consulting Architect but also pilot, spending time in front of my computer or flying in the air...

Lets talk about End User Computing Because we worth it ...

Adding Static Route to WS1 Access

I had a request from Spanish colleagues about adding static routes to Workspace One Access (in their case it was because of database in a different network).

I first had a look on our internal channel on Slack and find a first way to do it … but with Identity Manager version 3.3. However, when I try to test it in my Home Lab using my on-premise WS1 Access 20.10 it was totally different. vIDM 3.3 is based on Suse Linux when WS1 Access 20.10 is based on Photon 3. After some exchange by mail with my colleagues, they sent me the procedure they used for their deployment… different for the first two !!!
Yes they deployed Workspace One Access 20.01…

Basically both method work with vIDM 3.3 and Workspace One v20.01 as both are running Suse Linux

Method 1 : for Identity Manager 3.3 and WS1 Access 20.01: (thanks to Mahmood Ramzan for this one)

First edit “routes” files in /etc/sysconfig/network

vi /etc/sysconfig/network/routes

Then add your route in this form : <net_range>/<mask> <gateway> <interface>

10.1.2.0/24 192.168.12.254 eth0

Then restart your network and confirm the route is persistent:

# /etc/init.d/network restart
# ip route list

Method 2 : for Identity Manager 3.3 and WS1 Access 20.01: (thanks to Javier Perez for this one) :

After connecting to WS1 using sshuser and sudo as root (or direct login as root), create the ifroute-eth0 file

# vim /etc/sysconfig/network/ifroute-eth0	

Add your route (same format as for vIDM 3.3)
and set permission on this file:

# chmod 644 /etc/sysconfig/network/ifroute-eth0

Restart your network as explained above.

Method for Workspace One Access 20.10 and upward :
Starting with Workspace One Access 20.10, appliance are based on Photon 3.0. So adding a file call route-eth0 in /etc/sysconfig/network-scripts make it works by running /etc/sysconfig/network-scripts/ifup-routes but it doesn’t works when booting the appliance.

To add static routes to Photon appliance you need to follow this procedure :

So once logged as root edit this file : /usr/local/horizon/scripts/networkwizard.hzn

# vi /usr/local/horizon/scripts/networkwizard.hzn

Find the section “function save_sysconfig_properties” around line 800 (803 to be precise)

Alter the file to set the routes by adding the following lines in green :

function save_sysconfig_properties() {
    if [ $ETHO_DEVICE_RESTORED -eq 0 ]; then
      # any DHCP
      local DHCP=no
      if [ "$SYSCONF_IPV4_IP0" = "DHCP" -a "${SYSCONF_IPV6_IP[0]}" = "DHCP" ]; then
          DHCP="yes"
      elif [ "$SYSCONF_IPV4_IP0" = "DHCP" ]; then
          DHCP="ipv4"
      elif [ "${SYSCONF_IPV6_IP[0]}" = "DHCP" ]; then
          DHCP="ipv6"
      fi
      echo save $ETH0_CONF
      echo -n > $ETH0_CONF
      echo "[Match]" >> $ETH0_CONF
      echo "Name=eth0" >> $ETH0_CONF
      echo "" >> $ETH0_CONF
      echo "[Network]" >> $ETH0_CONF
      echo "DHCP=$DHCP" >> $ETH0_CONF
      if [ -n "$SYSCONF_IPV4_IP0" -a "$SYSCONF_IPV4_IP0" != "DHCP" ]; then
          echo "Address=$SYSCONF_IPV4_IP0/`mask2cdr $SYSCONF_IPV4_NETMASK`" >> $ETH0_CONF
          echo "Gateway=$SYSCONF_IPV4_GATEWAY" >> $ETH0_CONF
          echo "DNS=$SYSCONF_NET_DNS" >> $ETH0_CONF
          echo "LinkLocalAddressing=no" >> $ETH0_CONF
          echo "IPv6AcceptRA=no" >> $ETH0_CONF
          echo "[Route]" >> $ETH0_CONF
          echo "Destination=10.0.0.0/24" >> $ETH0_CONF
          echo "Gateway=192.168.0.250" >> $ETH0_CONF
          echo "GatewayOnlink=true" >> $ETH0_CONF
      fi
      if [ -n "${SYSCONF_IPV6_IP[0]}" -a "${SYSCONF_IPV6_IP[0]}" != "DHCP" ]; then
          local ndx=0
          while true
          do
              local tmpip=${SYSCONF_IPV6_IP[$ndx]}
              local tmppfx=${SYSCONF_IPV6_PFX[$ndx]}
              if [ -z "$tmpip" ]; then
                  break
              fi
              echo "Address$ndx='$tmpip/$tmppfx'" >> $ETH0_CONF
              ndx=$(($ndx + 1))
          done
      fi
    fi
}

Reboot the appliance to ensure it works fine

AD FS as IdP for Workspace ONE Access and UAG

I’ll not talk about the configuration of AD FS itself but how to create the relying party for both Workspace ONE Access and UAG… spoiler: the configuration is not the same 🙂

So here the common part who consist to the creation of the Relying Party Trusts:

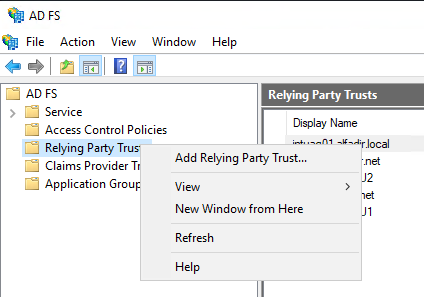
Open you AD FS Manager, select “Relying Party Truts” and with the select “Add Relying Party Trust…

Azure AD as IdP for Workspace One Access

This tuto will show you how to configure Azure AD as a 3rd party Identity Provider for Workspace One Access.

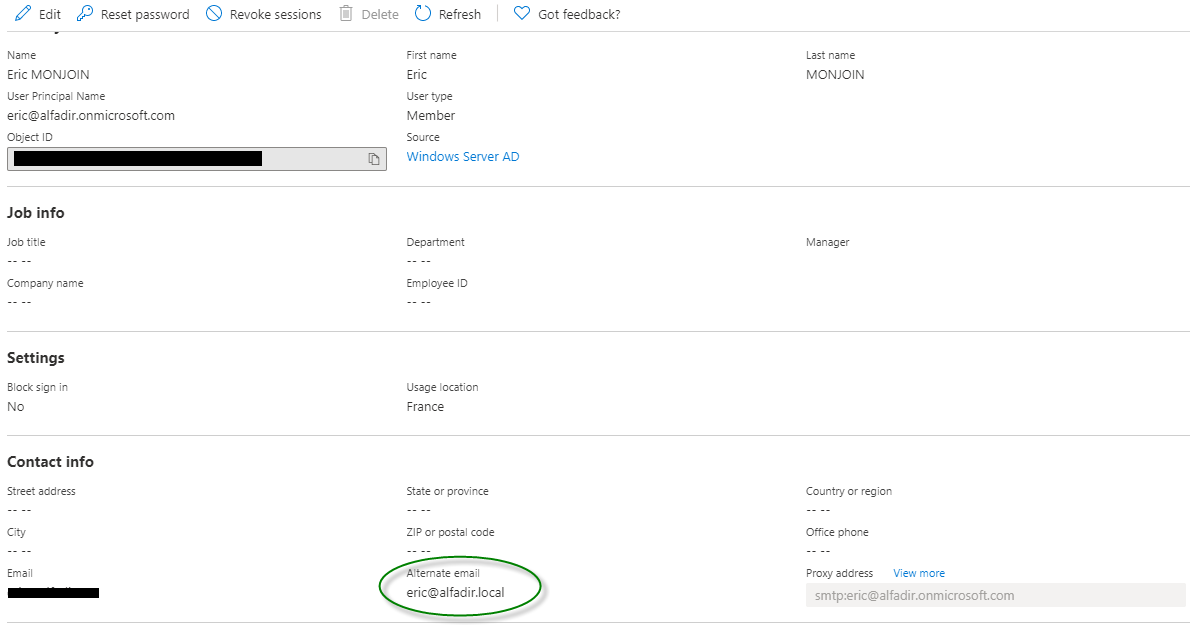
Note : In my case, the default Azure AD domain is alfadir.onmicrosoft.com but in order to match with my on-premise Active Directory I had to use not the email address or UPN but the “Alternate email”

So the first thing to do is to create a “New Application” in Azure, once logged on Azure Portal as Admin, select “Azure Active Directory“, then on the left pane, select “Enteprise applications” and click “New Application“:

Shibboleth as IdP for Workspace ONE Access

Recently I had to work on a project that imply Shibboleth as IdP (Identity Provider), so you will see below how to configure it in Workspace One Access as a 3rd party IdP.

One of the major issue with Shibboleth (in my case) is it only provides a samAccountName but not a UserPrincipalName (upn), so basically the User name without the domain name (eg. e.monjoin but not e.monjoin@mydomain.dom). It works in many situation excepted in a multi domain configuration where you can potentially have the same username in two different domain and you have a trust relationship between them (eg. e.monjoin@finance.domain.com and e.monjoin@technical.domain.com). In this case WS1 Access will not be able to choose a account you will see the following error :

Running VMware Unified Access Gateway on Hyper-V

Ok okkkkkk, I know that could be weird at first sight but I had a request from a customer to assist in the deployment of UAG 3.9 on Hyper-V in a “Dual DMZ” configuration.

The Back End UAG is deployed on vSphere but the the front-end should run on the DMZ hypervisors who are…. Windows 2019 Core / Hyper-V

So when we look at the files required to perform this installation we need to download 2 files :

  • Unifed Access Gateway (UAG) 3.9 PowerShell scripts to get all scripts to deploy the appliance
  • Unifed Access Gateway (UAG) 3.9 for Microsoft Azure to have .vhd file so Hyper-V disk format file.

App Volumes, load balancer health check

I recently had an issue with one of my App Volumes server: even if my server was down in an App Volumes point of view (connection lost the database), my Kemp load balancer see it up and running because: the web interface was up and favicon.ico was also available.

The template for App Volumes (part of Horizon 7 Template) is, in my opinion not complete and it missed the right way to configure health check

So the right way to configure load balancer ‘s health check is the following :

For Kemp :

Moving Workspace One Access database to a new MS SQL Server

I had to validate how to migrate WS1 Access database to another SQL Server.

This test concerns a dual-site configuration with 3 active nodes (R/W) on Site-A et 3 passive nodes on site B (R/O).

The first thing I did, was to set all nodes to passive (so read-only for all) so no more update will be done on the database.

After that I made a SQL backup of my database and copied it the new MS SQL Server.

VMware Horizon on Windows Server Core 2019

I recently have a customer requesting to install VMware Horizon on a Windows 2019 Core server. Most of customers prefer to have the “Desktop Experience” but for security reason some other prefer to limit to shell only interface.

Before installing VMware Horizon, ensure that all updates are applied to Windows 2019 Core (I had some strange behavior before doing that, like impossible to have the Flex Admin console or get “Login failed” on the new HTML 5 consoles)

The first main concern is getting signed certificate ready so Horizon will use it instead of its self signed certificate.

After copying the certificate in a local folder :

1 ) From the Administrator command prompt, type “powershell” to execute PowerShell command